-By Dan Schwartz
In this post, I will show you how to minimize stress and maximize productivity within your Gmail Inbox. Follow these 5 steps, and be set free…
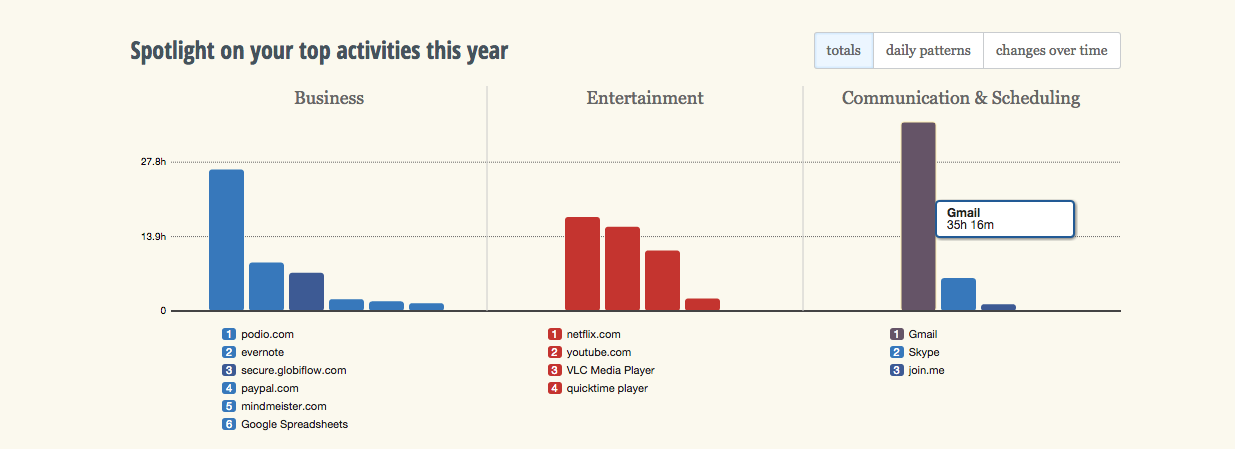
This is a snapshot taken from RescueTime that breaks down my computer activity so far in 2015. I probably watch too much Netflix…but House of Cards is so good! I’m also clearly a Podio dork…but topping all websites, at a whopping 35 hours, is the massively time sucking GMAIL.com email platform…This tool gives me a clear picture of where the bulk of my time is spent online. If you’re familiar with the 80/20 principle, you know that that 80% of your productivity will naturally come from 20% of your actions. It remains to be seen if Gmail is the source of 80% of my results, but regardless, this tells me that I need to make this huge chunk of precious life-time as efficient and streamlined as humanly possible.
A few months ago, I was determined to minimize my email related anxiety and go from Inbox 1245 to Inbox ZERO once and for all. On this post, I will show you how to do just that using some amazing tools and harnessing the power of Essential vs. Non-Essential. This practice was taught to me by Ari Meisel, author of the amazing book Less Doing (highly recommend read for your productivity nerds). including a system of preliminary housekeeping, adjusting your Gmail settings, and best practices for processing email…For instance, did you know you can very easily “ARCHIVE” a message, which removes a message from your Inbox, but doesn’t delete it so you can search for it later if needed? And if someone responds, it will come back into your Inbox so you can take care of it??
Archiving alone is a super powerful tool that you’ll learn to use daily, we’ll talk about that and much more later. Now, Let’s dive in and GET TO ZERO together!
Step 1: Backup Your Gmails
First, let’s save a record of all your emails in your inbox so you can have the peace of mind in case you decide to delete everything and start fresh…or just have them on file for safekeeping.
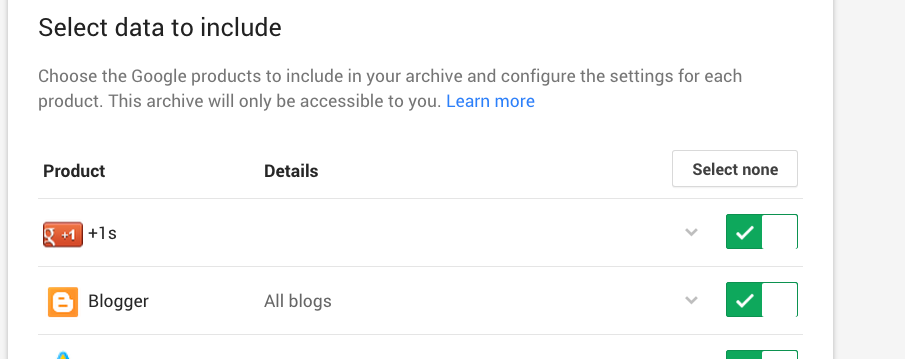
Go to Google’s cloud backup tool: https://www.google.com/settings/takeout
Under “Select data to include” Choose “Select None”
Then, scroll down and select the checkbox next to “Mail”, and choose “All Mail”
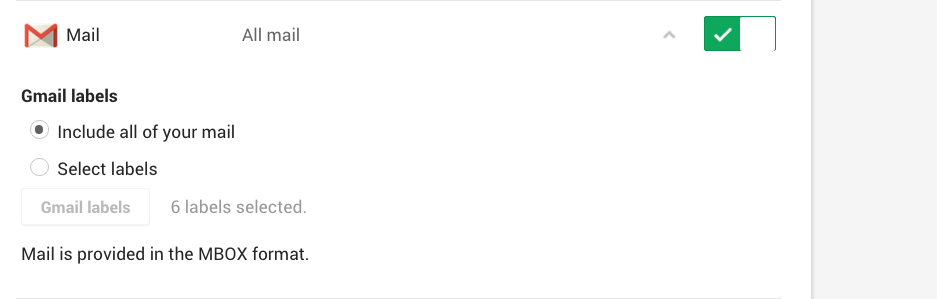
Scroll down and click “Next”. Then choose Zip file as your file type, select your delivery method, and click “Create Archive.” It takes a few hours, but this will send you a link so you can download a record of your entire Gmail Inbox.
Step 2: Manage Your Subscriptions with Unroll.me
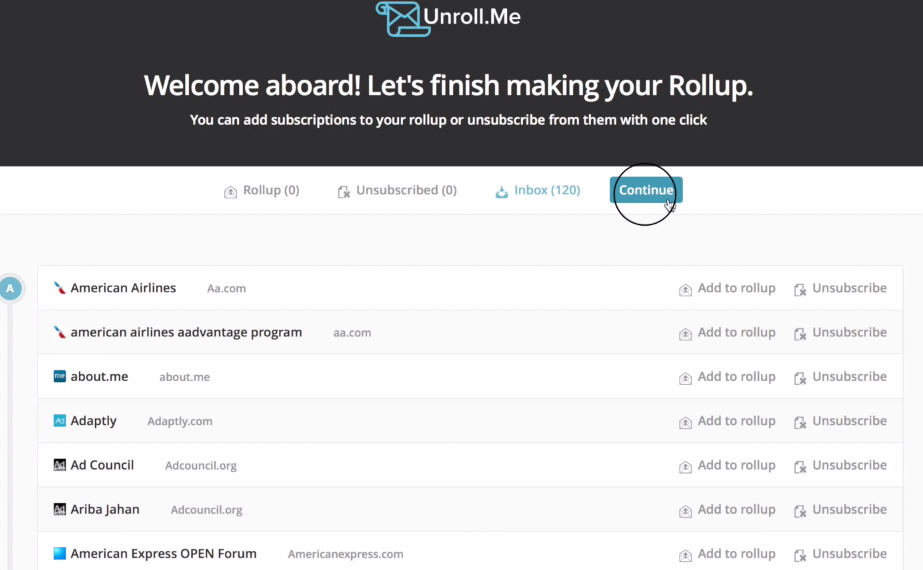
You will be shocked to see how many random subscriptions are associated with your Gmail address. To get these under control, and one-click unsubscribe from all un-needed subscriptions on your account, go to www.Unroll.me, and click on Get Started. It’s free to use and completely awesome.
Once you enter your Gmail address, it will scan your inbox for all the subscriptions you are currently registered on. You’ll then see a whole list of your subscriptions, as well as the option to unsubscribe from each one, or add to to your “Rollup,” which compiles all your selected subscription emails into just ONE “Rollup” email. Do this now.
Step 3: Install These Crucial Tools
Boomerang: You won’t be able to live without it! With Boomerang, you can quickly defer emails for later, OR respond to emails and have it automatically “boomerang” back to the top of your inbox if the recipient doesn’t respond in a selected time frame. It’s built right into your Gmail interface. Never forget about important emails again!
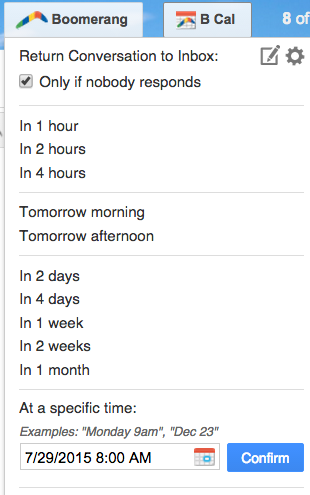
You can also schedule an email to be sent later. This tool this will play a crucial role in how your process your emails, which we will discuss soon. Visit http://www.boomeranggmail.com/ and signup for a free trial now. You can get unlimited “Boomerang’s” when you eventually signup for the Personal Plan, which is what I use.
Followup.cc: This tool is designed to defer or remind you about an email just like Boomerang, but it’s setup a little different so you can use this on ANY device. You don’t need to be on your Gmail dashboard. All you need to do if you want to be reminded about any email is send that email or BCC that email to an email address like “Monday@followup.cc” or “1week@followup.cc” or “dec15-1pm@followup.cc” and it will come right back into your inbox on the selected time so you don’t forget about it! This is mandatory so you can process emails for Inbox Zero on your smart phone.
Taking it one step further…you can also schedule recurring reminders so you never forget about an email that needs recurring reminders. Sign up for the free trial at Followup.cc. If you get their paid unlimited plan, get 15% off by applying the discount code “schwartz15” at checkout!
These tools are mandatory for processing emails for “Inbox Zero” status. The following tools are optional, but still awesome!
Rapportive: Rapportive is a Gmail extension that displays social media data of your email recipients right in your interface. It loks like this in your browser:
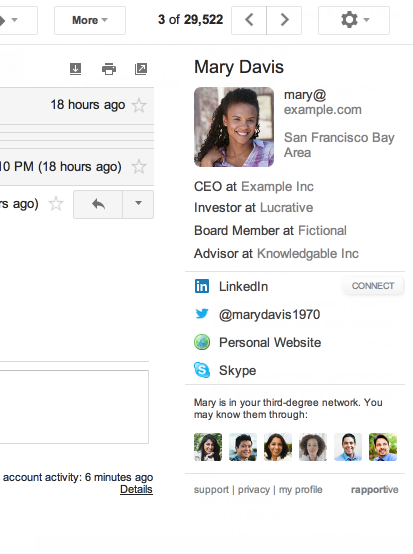
I use this to quickly see information about a client or someone who has reached out to me so I can personalize my communication with them…”I see you work at ‘Fictional’ in SF, I love it out there!”
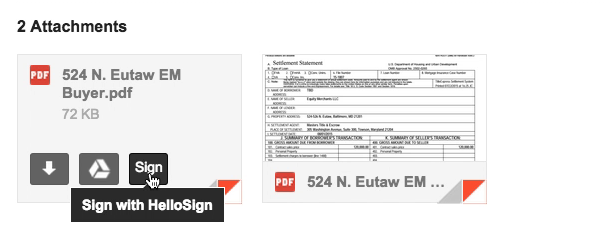
HelloSign For Gmail: I use this at least twice a week. With this tool, you can digitally sign an incoming PDF document without leaving your browser, and the signed document gets attached right back to the email that it was originally sent from…absolutely crucial! Oh, and it’s free! I <3 technology.
Evernote Web Clipper: If you use Evernote or not, this tool will come in handy if you ever want to take some important information from out of Gmail and into your cloud based Evernote account. You can quickly whole emails, selected text, or screen shots of items from an email with a few clicks using this Chrome extension. Quickly categorize it so you can find it in your Evernote later. It’s free to use.
KeyRocket: If you spend as much time in Gmail as I do, you need to make every second count, right!? With KeyRocket, every time you perform an action in Gmail, the KeyRocket extension will tell you how to execute that action using keystrokes instead of using your mouse (via a little pop up box). Eventually, you’ll only just need to use the keypad to quickly get around your Inbox.
Step 4: Gmail Settings
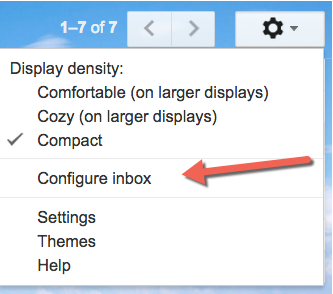
Configure Your Inbox:
Remember when Gmail changed everything and all of a sudden you had these weird redundant “Promotions” and “Social” tabs in your inbox? GET RID OF THESE, by choosing “Configure Inbox” in your settings (top right) and unselecting everything except “Primary.”
Activate “Send And Archive” Feature:
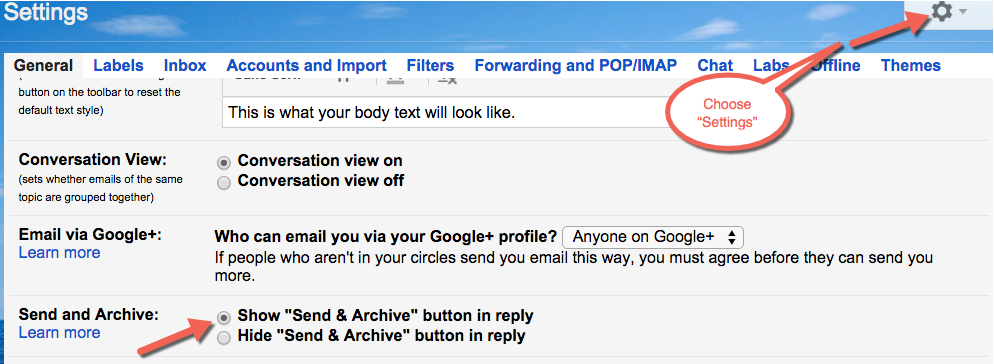
Why is this important? Simply put…Archiving messages removes messages from your inbox, but keeps them in your account under the “All Mail” label so that you can always find them later. Archiving is like moving messages into a filing cabinet for safekeeping,
rather than putting them in the trash can. Helps get messages out of the way until someone RESPONDS, then it comes back into your inbox for processing!
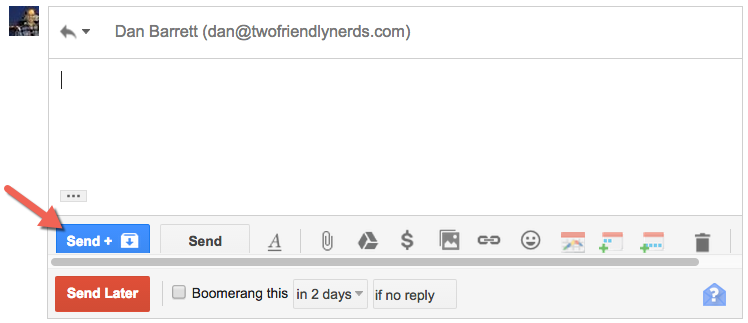
Selecting this feature makes archiving automatically when replying to an email. Just click the blue button shown below and you send it and simultaneously get it OUT of your inbox until they reply. If you have the Boomerang installed, you can even choose when you want it to come back into your inbox, THEN Send+Archive.
Create your Labels and Master Filter
It will be easier to show you how to do this through a quick video, where we will cover:
- Hiding all old labels except “All Mail”
- Creating your “Optional” label
- Creating your master “Spam” filter
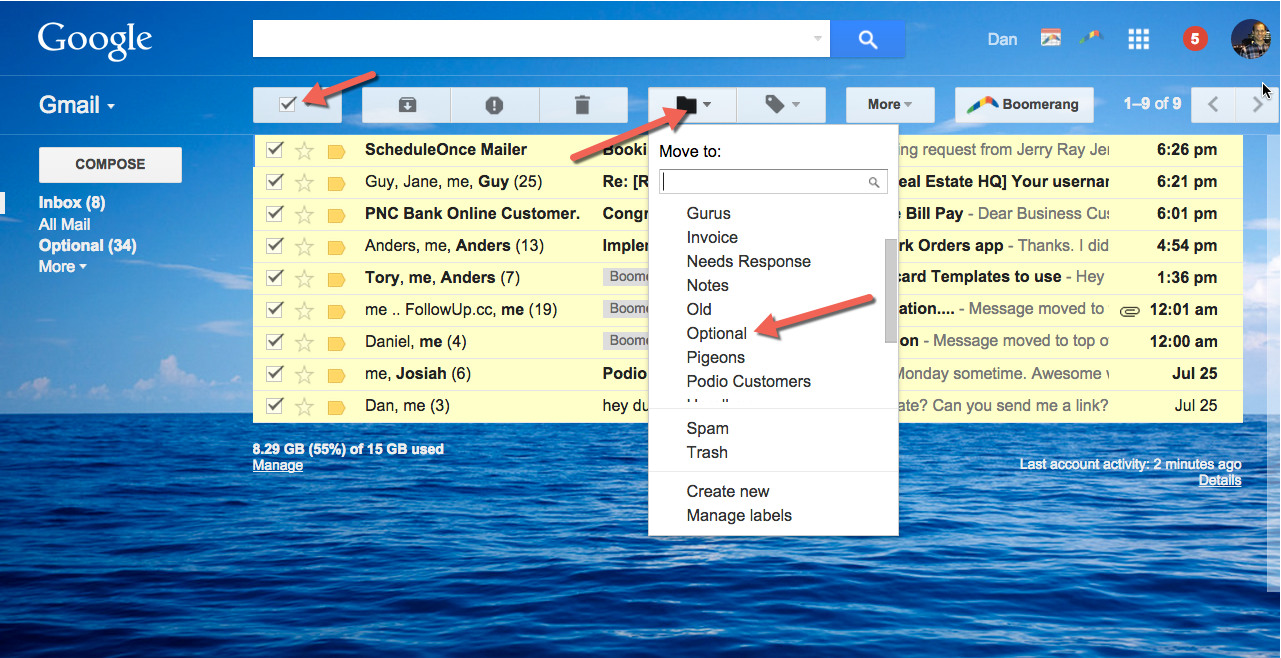
Clear Your Inbox!
Take care of some of important emails at the top of your still-cluttered inbox, then Select All by choosing the box shown below on the left side. Then, click on the Folder icon, and move ALL of your emails into the “Optional” label. You can always go in here to take care of any of your old cluttered inbox emails, but from here on out, we will be maintaining a clean and stress free inbox!
Step 5: Processing Your Emails
We’ve laid the groundwork and set you up for success in your email life. Remember, this can be a huge chunk of your time, so it’s important to follow these steps and make the following process a habit every day! Now, every single email that comes into your clean inbox will have one of the following options:
Essential Emails:
- Take Action
- Defer it
Non-Essential Emails:
- Create a Filter so it goes into your “Optional” folder from now on
- Delete it
- Unsubscribe
Here’s a video example of how I process some of my emails so you can see which of the aforementioned tools are being used to accomplish Inbox Zero.
For any help with this, or automating your business processes using Podio and other automation tools, feel free to reach out at Dan@realautomation.biz
Cheers to your success, I’ll see you at Zero!
-Dan